One of the things I dread about the holidays is the onslaught of emails that will fill my inbox. I suspect I’m not the only person that is annoyed by the massive amounts of marketing finding their way to the inbox. This article is my attempt to create a little slice of peace for the holidays. Because I don’t own email accounts on all of the major email servers, I consulted the chatbot at openai.com concerning the steps for configuring the SPAM filters at major players.
General Overview
Configuring spam settings for your email account can help you reduce the amount of unwanted and potentially harmful emails you receive. The exact steps may vary depending on the email service or client you’re using, but I can provide you with a general overview of the process:
- Log into your Email Account: Open your email client or access your email service provider’s website and log in to your email account.
- Access Spam Settings:
• For Webmail Services (e.g., Gmail, Outlook.com):
• Gmail: Click the “Settings” gear icon in the top right corner, then go to “See all settings” > “Filters and Blocked Addresses.”
• Outlook.com: Click the “Settings” gear icon in the top right corner, then select “View all Outlook settings” > “Mail” > “Junk email.”
• For Email Clients (e.g., Outlook, Thunderbird):
• The location of spam settings can vary, but it’s typically found in the settings or preferences menu. Look for options related to junk or spam mail. - Adjust Spam Filters:
• In the spam settings, you can typically adjust the sensitivity of the spam filter. You can usually choose between different levels, such as “Low,” “Medium,” or “High,” depending on how aggressive you want the filter to be.
• You can also add specific email addresses or domains to your blocklist or allowlist. Emails from addresses on the blocklist will be automatically marked as spam or sent to the spam folder, while those on the allowlist will be exempt from spam filtering. - Reporting Spam:
• Many email services have a “Report Spam” or “Mark as Spam” option. Use this feature to help improve the spam filter’s accuracy. Reporting spam will help your email provider learn from your actions and prevent similar emails from reaching your inbox in the future. - Check Spam Folder Regularly:
• Even with spam settings in place, some legitimate emails may occasionally end up in the spam folder. Be sure to check your spam folder regularly and mark any false positives as “Not Spam.” - Stay Informed:
• Keep up to date with your email provider’s documentation and recommendations regarding spam settings. The methods and features can change, so being informed will help you maintain effective spam control. - Use Third-Party Tools (Optional):
• If you receive a high volume of spam and your email provider’s built-in filters are not sufficient, you can consider using third-party spam filter tools or services. These can provide additional layers of protection.
Remember that the exact steps and options may vary based on your email provider, so consult their specific documentation or support resources for detailed instructions on configuring spam settings for your particular service or client.
For my loyal customers who host their IMAP email domains with Comp-U-Talk
Browse to http://webmail.emailsrvr.com
Login with your email address and password.
Once there, click on the triple bars in the top right corner. It will be to the right of your email address.

Choose Settings from the drop down menu.
Click Spam Settings in the left column.

Let the aggressions begin. Not feeling nice? Set it to exclusive, just remember to add Mom to the Safelist.
Feeling invincible? Delete all spam immediately—but if something gets marked as spam by accident, there is no getting it back.
The safer option would be to Include [SPAM] at the beginning of the subject of line. With [SPAM] at the beginning of the subject line you can create a rule to filter all such emails into the Spam folder.
At the main email screen, highlight the email you want to move into the Spam Folder. Click the More button and the choose Add new Filter.

Give the Filter a name. I suggest SPAM. And then fill out the rest of the boxes according to your likes and dislikes. To move all emails marked as [SPAM] the filter would look like this:
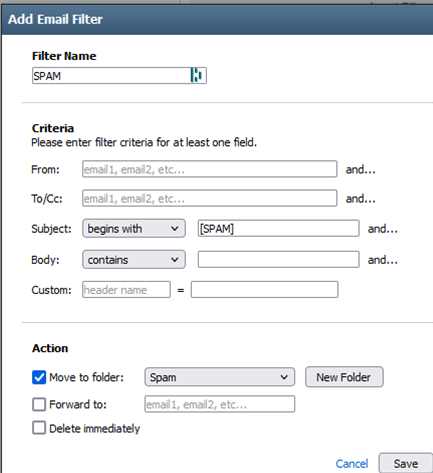
Save the settings and check the Spam folder occasionally for misdirected emails.
GMAIL
To configure spam settings in Gmail, follow these steps:
- Log into your Gmail Account: Open your web browser and go to Gmail. Sign in with your Gmail email address and password.
- Access Gmail Settings:
• Click the “Settings” gear icon in the top right corner of the Gmail interface.
• Select “See all settings” from the dropdown menu. - Navigate to the “Filters and Blocked Addresses” Tab:
• In the settings menu, click on the “Filters and Blocked Addresses” tab. - Configure Spam Settings:
• In the “Filters and Blocked Addresses” section, you can create filters to manage how Gmail handles incoming emails.
• To set up spam filters, click on “Create a new filter” or “Create a new filter in Settings.” - Define Filter Criteria:
• In the “From” field, you can specify email addresses or domains from which you want to filter out spam.
• You can also define other criteria, such as keywords or subject lines that are commonly associated with spam. - Click “Create Filter”:
• After defining the criteria for your filter, click the “Create filter” button. - Configure Filter Actions:
• In the next window, you can choose what actions Gmail should take when emails meet the filter criteria. To manage spam, select options like:
• “Mark as spam”: This option will automatically mark incoming emails matching the filter criteria as spam.
• “Delete it”: This will delete emails matching the criteria.
• “Never send it to Spam”: This will ensure emails matching the criteria are not treated as spam.
• You can select multiple actions if desired. - Save Changes:
• Click the “Create filter” button to save the filter settings. - Review and Adjust Spam Filters:
• To review or modify your spam filters, you can return to the “Filters and Blocked Addresses” tab at any time and make changes as needed. - Check Spam Folder Regularly:
• Even with spam filters in place, occasionally check your spam folder to ensure that legitimate emails have not been marked as spam by mistake. - Report Spam:
• If you receive spam emails in your inbox, make sure to mark them as spam by selecting the email and clicking the “Report spam” button in the toolbar. This helps Gmail improve its spam filter.
Remember that Gmail’s spam filter is quite effective, but it’s always a good idea to customize your filters to match your specific needs. Additionally, Gmail’s spam filter learns from your actions, so reporting and marking spam accurately will help improve its accuracy over time.
Outlook.com
- Log into Your Outlook.com Account: Open your web browser and go to Outlook.com. Sign in with your Microsoft account email address and password.
- Access Outlook.com Settings:
• Click the “Settings” gear icon in the top right corner of the Outlook.com interface.
• Select “View all Outlook settings.” - Navigate to the “Mail” Section:
• In the settings menu, select “Mail.” - Configure Spam Settings:
• In the “Mail” settings, navigate to the “Junk email” section. Here, you can configure how Outlook.com handles spam. - Adjust Filter Options:
• You’ll find options to control the sensitivity of the junk email filter. You can choose between “Standard,” “Low,” and “High” settings, depending on how aggressively you want to filter out spam. - Safe Senders and Domains:
• Under “Filters and reporting,” you can manage your safe senders and domains. You can add trusted email addresses and domains to ensure their emails are not marked as junk. - Blocked Senders:
• You can also add specific email addresses or domains to your block list. Emails from addresses on this list will be automatically marked as junk. - Blocked Attachments:
• You can configure settings to block specific types of attachments commonly used in spam emails. - Reporting Spam:
• If you receive a spam email in your inbox, you can report it as spam by selecting the email and clicking the “Junk” button in the toolbar. - Save Changes:
• Be sure to save your changes when you are done configuring the spam settings.
For Microsoft Outlook Desktop (Windows):
If you are using Microsoft Outlook as a desktop application on Windows, the process for configuring spam settings may vary slightly:
- Open Outlook: Launch the Outlook desktop application.
- Go to “Junk Email Options”:
• Click on the “Home” tab in the top ribbon.
• Click on “Junk” in the “Delete” group.
• Select “Junk Email Options.” - Configure Spam Settings:
• In the “Junk Email Options” window, you can configure various settings related to spam filtering and blocking. You can adjust the level of junk email protection, manage your safe and blocked senders, and more. - Report Spam:
• If you receive spam emails in your inbox, you can mark them as junk by selecting the email and clicking the “Junk” button in the toolbar. - Save Changes:
• After configuring your spam settings, click “OK” to save your changes.
The specific options and user interface may vary slightly depending on the version of Outlook you’re using, so consult your version’s documentation or help resources for more detailed instructions.
Yahoo
To configure spam settings in Yahoo Mail and manage unwanted emails effectively, follow these steps:
Log into Your Yahoo Mail Account: Open your web browser and go to Yahoo Mail. Sign in with your Yahoo email address and password.
- Access Yahoo Mail Settings:
• Click on the “Settings” gear icon in the upper-right corner of the Yahoo Mail interface. - Navigate to the “More Settings” Option:
• In the settings menu, select “More Settings” at the bottom of the list. - Configure Spam Settings:
• In the “More Settings” menu, you’ll find several options, including “Security and Privacy” and “Filters.”
• Click on “Filters.” - Create a New Filter:
• In the “Filters” section, you can create a new filter for managing spam. Click the “+ Add” button to create a new filter. - Define Filter Criteria:
• In the filter creation window, define the criteria for the filter. You can specify email addresses, domains, or keywords associated with spam. - Set Filter Actions:
• You can define actions for emails that match the filter criteria. For managing spam, you can choose actions such as moving the email to the Spam folder or marking it as read. - Save the Filter:
• Click the “Save” button to save the filter settings. - Review and Adjust Spam Filters:
• You can always return to the “Filters” section to review, modify, or delete filters as needed. - Check Spam Folder Regularly:
• Even with spam filters in place, periodically check your Spam folder to ensure legitimate emails haven’t been incorrectly flagged as spam.
For Yahoo Mail Mobile App:
If you are using the Yahoo Mail mobile app, you can also configure spam settings:
- Open the Yahoo Mail app on your mobile device.
- Tap the menu icon (usually three horizontal lines) to open the navigation menu.
- Scroll down and tap “Settings.”
- Select your Yahoo email account.
- Tap “Spam.”
- Here, you can adjust your spam filter settings and manage blocked email addresses and domains.
- You can also set up custom filters to manage spam by tapping “Filter emails.”
Remember that Yahoo’s spam filter is designed to be effective, but it’s a good practice to customize your spam filters to suit your specific needs. Additionally, if you receive any legitimate emails in your Spam folder, mark them as “Not Spam” to help Yahoo’s filters improve their accuracy over time.